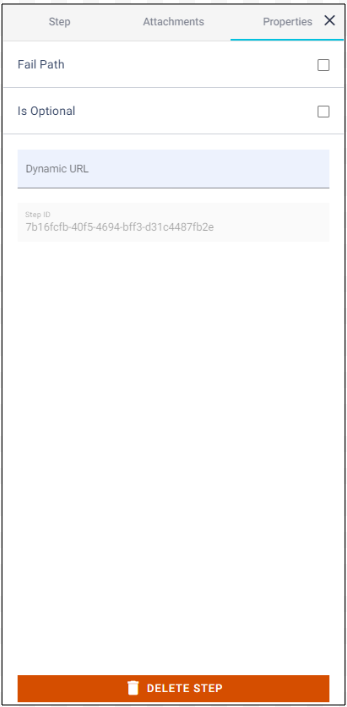
Step Properties allow additional settings to be added to a step, if needed.

Each step within the Workflow build has its own unique Step ID which can be viewed and copied via the Step Properties panel. Step IDs are used for downstream data integrations and when building custom reports. Step Tags can also be added and used in place of Step IDs.
The Step Properties panel also allows the step to marked as either a Fail Path or Is Optional. By default WorkfloPlus presents users with a 'soft stop' if certain parameters are not met, or if the step is missed, however users have the option to continue through the job anyway and override this warning if they wish.

PLEASE NOTE: Dynamic URL is not currently supported.
Fail Path
A Fail Path can be used to guide the user down a different path within a workflow if certain defined parameters are not met, or if the step is missed completely.
For example, if a thermostat reading needs to be between 20 and 30 degrees and if it is outside of that range, the Fail Path route can take the user to a different step requesting they initiate a repair. If the reading is within range, then the user can continue through the workflow as normal. Another example might be that if it is mandatory to take a photograph then the Fail Path could direct the user to a further step reminding them of the importance of taking a photograph which then loops back to the Photo Step.
PLEASE NOTE: Fail Paths cannot be used on Instruction Steps, Decision Steps or Group Steps.
To use a Fail Path, check the Fail Path box in the Properties panel for the step.

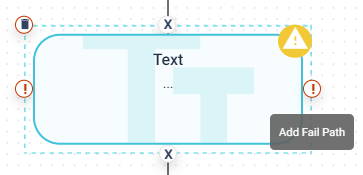
Once selected additional markers will appear for the Fail Path route. Simply hover over one of the markers and connect the Fail Path route to another step to complete your path.

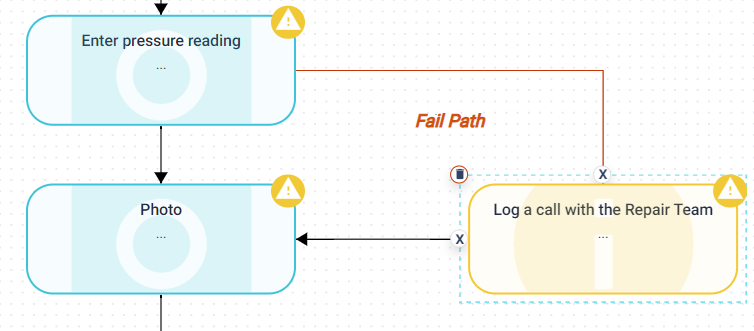
In this example the Fail Path is being used on a Numeric Step to log a pressure reading. If a number range has been defined in the Numeric Step and the entry is outside of that range, or if it is missed altogether, the user will be directed to the Instruction Step asking them to log a call with the Repair Team. Fail Paths will be labelled automatically.

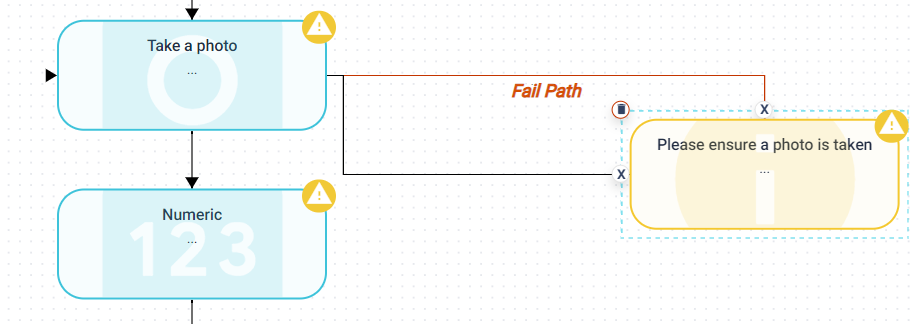
In this next example the Photo Step is mandatory and if a photo is not taken the user will be directed to an Instruction Step reminding them of this. This Instruction Step loops back to the original Photo Step requesting this is completed.

It is important to remember that the Fail Path route must be connected back into the Workflow or directly to a Terminate Step otherwise errors will be displayed and it will not be possible to publish the Workflow.
Is Optional
If a step is made optional then no warning will be displayed if an entry is made outside of a predefined range, or if the step is missed completely.
Optional steps allow the user to navigate past the step without having to bypass the soft stop warning. This can improve the user experience when completing a job as there are less steps to click through.
PLEASE NOTE: Is Optional cannot be used on Instruction Steps, Decision Steps or Group Steps.
To make a step optional, check the Is Optional box in the Properties panel for the step.

Step Properties