Instruction Step
Instruction Steps tell the user to do something. For example this might be to watch a video, read some instructions or carry out a task.
To populate the step with information double click on the step and this will bring up the Step Details panel. There are 3 tabs across the top: Step, Attachments and Properties.
TIP: You can use the dropdown arrow at the top to switch between different step types.
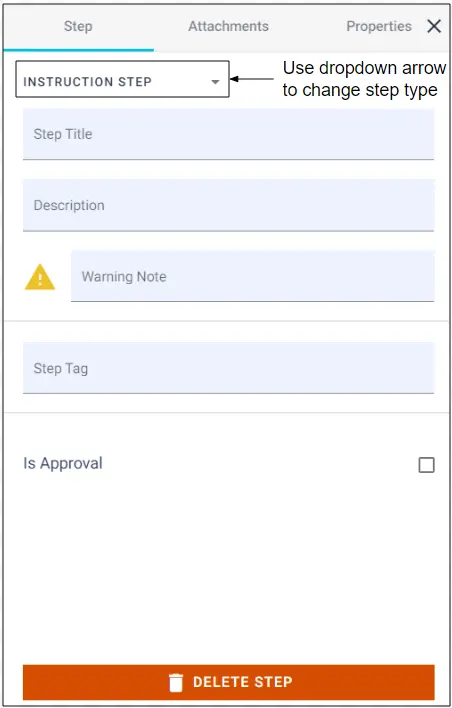
Enter the Step Title and Description in this panel.
PLEASE NOTE: Step Titles and Step Descriptions are not mandatory, however if you leave them blank you will see a yellow warning triangle. This does not prevent you from publishing the Workflow.
You can also add a Warning Note which will be displayed before the user can navigate through to the next step.
TIP: Warning Notes are useful for compliance. For example, if you wanted to make sure a user is wearing PPE clothing before they start a process then the user has to click through to confirm they have read the warning before they can proceed any further.
Step Tags can also be added, if required. These are commonly used for integrations and custom report creation. Note: Step Tags have to be unique.
PLEASE NOTE: Is Approval is not currently supported.
Text Step
Text Steps require the user to enter some information. They are alphanumeric.
To populate the step with information double click on the step and this will bring up the Step Details panel. There are 3 tabs across the top: Step, Attachments and Properties.
TIP: You can use the dropdown arrow at the top to switch between different step types.
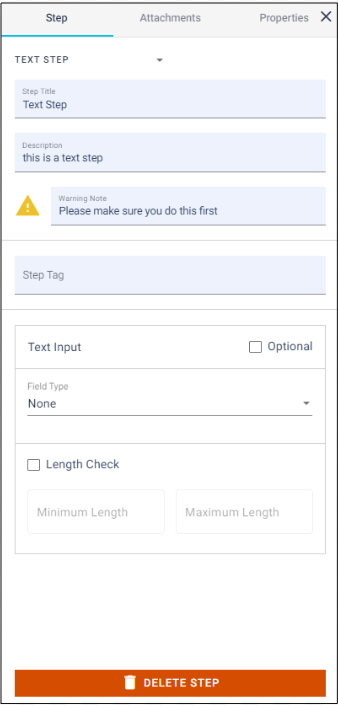
Enter the Step Title and Description in this panel.
PLEASE NOTE: Step Titles and Step Descriptions are not mandatory, however if you leave them blank you will see a yellow warning triangle. This does not prevent you from publishing the Workflow.
You can also add a Warning Note which will be displayed before the user can navigate through to the next step.
TIP: Warning Notes are useful for compliance. For example, if you wanted to make sure a user is wearing PPE clothing before they start a process then the user has to click through to confirm they have read the warning before they can proceed any further.
Step Tags can also be added, if required. These are commonly used for integrations and custom report creation. Note: Step Tags have to be unique.
To make the step Optional check this box. This will ensure that the user does not receive a warning if they navigate past this step without completing it. Additionally if a Length Check has been defined and the entry falls outside of these parameters, no warning will be given.
You can define the Field Type by clicking on the dropdown arrow. By default it is 'None' however you can also choose Email or URL.
Finally, if appropriate you can add a Length Check which will define how many characters can be entered. If the entry is too short or too long a warning will be displayed before the user can navigate to the next step unless the step has been marked Optional.
Numeric Step
Numeric Steps require the user to enter numbers only.
To populate the step with information double click on the step and this will bring up the Step Details panel. There are 3 tabs across the top: Step, Attachments and Properties.
TIP: You can use the dropdown arrow at the top to switch between different step types.
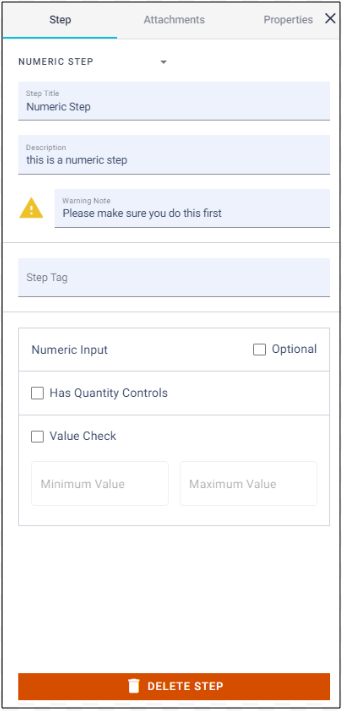
Enter the Step Title and Description in this panel.
PLEASE NOTE: Step Titles and Step Descriptions are not mandatory, however if you leave them blank you will see a yellow warning triangle. This does not prevent you from publishing the Workflow.
You can also add a Warning Note which will be displayed before the user can navigate through to the next step.
TIP: Warning Notes are useful for compliance. For example, if you wanted to make sure a user is wearing PPE clothing before they start a process then the user has to click through to confirm they have read the warning before they can proceed any further.
Step Tags can also be added, if required. These are commonly used for integrations and custom report creation. Note: Step Tags have to be unique.
To make the step Optional check this box. This will ensure that the user does not receive a warning if they navigate past this step without completing it. Additionally if a Value Check has been defined and the entry falls outside of these parameters, no warning will be given.
If checked Quantity Controls enables users on mobiles and tablets to scroll up and down through the numbers using + and - buttons.


Finally, if appropriate you can add a Value Check to define a minimum and/or maximum value. If anything is entered outside of this range a warning will be displayed before the user can navigate to the next step, unless the step has been marked Optional.
Photo Step
Photo Steps require the user to take a photo.
PLEASE NOTE: If the user is running the job on their web browser, this step will launch the File Manager, from where a photo can be selected and uploaded. If the user is running the job on their mobile or tablet the device camera will launch, or the user can select from previously taken images.
To populate the step with information double click on the step and this will bring up the Step Details panel. There are 3 tabs across the top: Step, Attachments and Properties.
TIP: You can use the dropdown arrow at the top to switch between different step types.
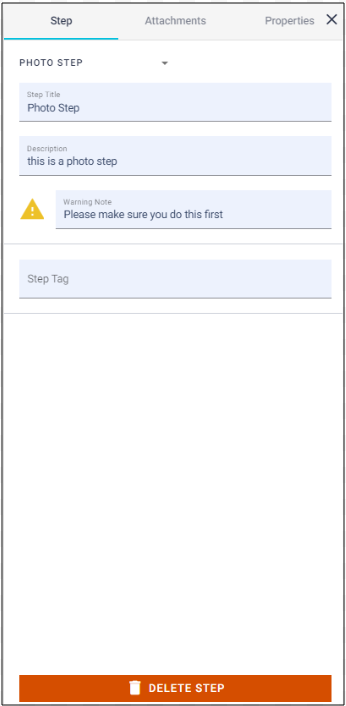
Enter the Step Title and Description in this panel.
PLEASE NOTE: Step Titles and Step Descriptions are not mandatory, however if you leave them blank you will see a yellow warning triangle. This does not prevent you from publishing the Workflow.
You can also add a Warning Note which will be displayed before the user can navigate through to the next step.
TIP: Warning Notes are useful for compliance. For example, if you wanted to make sure a user is wearing PPE clothing before they start a process then the user has to click through to confirm they have read the warning before they can proceed any further.
Step Tags can also be added, if required. These are commonly used for integrations and custom report creation. Note: Step Tags have to be unique.
Video Step
Video Steps require the user to take a video.
PLEASE NOTE: If the user is running the job on their web browser, this step will launch the File Manager, from where a video can be selected and uploaded. If the user is running the job on their mobile or tablet the device camera will launch, or the user can select from previously taken videos.
To populate the step with information double click on the step and this will bring up the Step Details panel. There are 3 tabs across the top: Step, Attachments and Properties.
TIP: You can use the dropdown arrow at the top to switch between different step types.
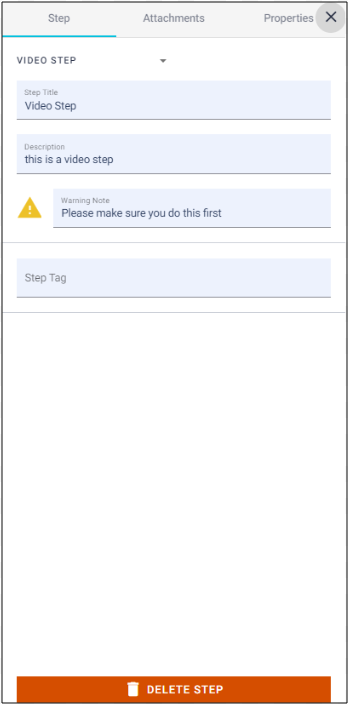
Enter the Step Title and Description in this panel.
PLEASE NOTE: Step Titles and Step Descriptions are not mandatory, however if you leave them blank you will see a yellow warning triangle. This does not prevent you from publishing the Workflow.
You can also add a Warning Note which will be displayed before the user can navigate through to the next step.
TIP: Warning Notes are useful for compliance. For example, if you wanted to make sure a user is wearing PPE clothing before they start a process then the user has to click through to confirm they have read the warning before they can proceed any further.
Step Tags can also be added, if required. These are commonly used for integrations and custom report creation. Note: Step Tags have to be unique.
Date/Time Step
Date/Time Steps require the user to take enter a date and/or time, or both.
PLEASE NOTE: Date/Time Steps are not supported on Realwear headsets.
To populate the step with information double click on the step and this will bring up the Step Details panel. There are 3 tabs across the top: Step, Attachments and Properties.
TIP: You can use the dropdown arrow at the top to switch between different step types.
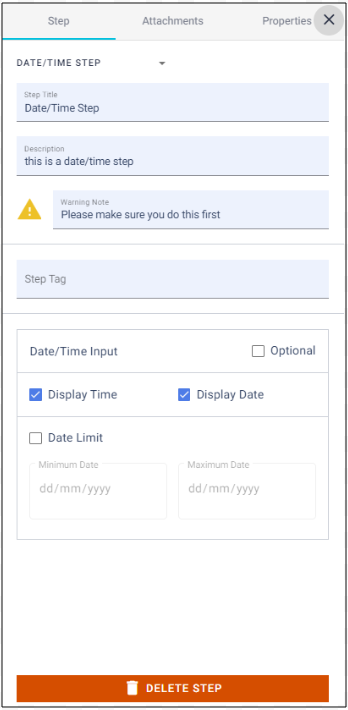
Enter the Step Title and Description in this panel.
PLEASE NOTE: Step Titles and Step Descriptions are not mandatory, however if you leave them blank you will see a yellow warning triangle. This does not prevent you from publishing the Workflow.
You can also add a Warning Note which will be displayed before the user can navigate through to the next step.
TIP: Warning Notes are useful for compliance. For example, if you wanted to make sure a user is wearing PPE clothing before they start a process then the user has to click through to confirm they have read the warning before they can proceed any further.
Step Tags can also be added, if required. These are commonly used for integrations and custom report creation. Note: Step Tags have to be unique.
To make the step Optional check this box. This will ensure that the user does not receive a warning if they navigate past this step without completing it. Additionally if a Date Limit has been defined and the entry falls outside of these parameters, no warning will be given.
You can select whether the user needs to enter either the Date or Time or both by checking the relevant boxes.
Finally, if appropriate you can add a Date Limit to define a minimum and/or maximum date. If anything is entered outside of this range a warning will be displayed before the user can navigate to the next step, unless the step has been marked Optional.
Signature Step
Signature Steps require the user to sign when completing a job.
PLEASE NOTE: Signature Steps are not supported on Realwear headsets.
To populate the step with information double click on the step and this will bring up the Step Details panel. There are 3 tabs across the top: Step, Attachments and Properties.
TIP: You can use the dropdown arrow at the top to switch between different step types.
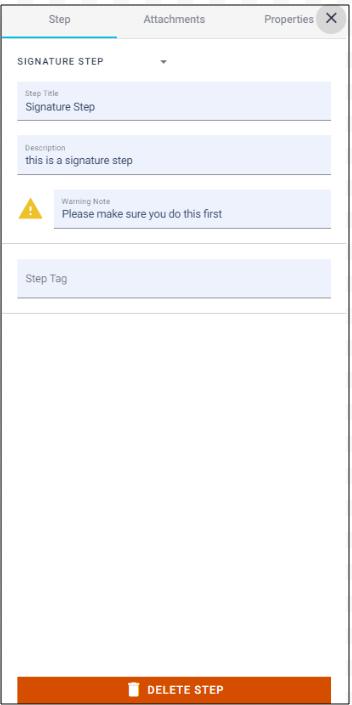
Enter the Step Title and Description in this panel.
PLEASE NOTE: Step Titles and Step Descriptions are not mandatory, however if you leave them blank you will see a yellow warning triangle. This does not prevent you from publishing the Workflow.
You can also add a Warning Note which will be displayed before the user can navigate through to the next step.
TIP: Warning Notes are useful for compliance. For example, if you wanted to make sure a user is wearing PPE clothing before they start a process then the user has to click through to confirm they have read the warning before they can proceed any further.
Step Tags can also be added, if required. These are commonly used for integrations and custom report creation. Note: Step Tags have to be unique.
Selection Step
Selection Steps require the user to choose between a pre-defined list of options.
To populate the step with information double click on the step and this will bring up the Step Details panel. There are 3 tabs across the top: Step, Attachments and Properties.
TIP: You can use the dropdown arrow at the top to switch between different step types.

Enter the Step Title and Description in this panel.
PLEASE NOTE: Step Titles and Step Descriptions are not mandatory, however if you leave them blank you will see a yellow warning triangle. This does not prevent you from publishing the Workflow.
You can also add a Warning Note which will be displayed before the user can navigate through to the next step.
TIP: Warning Notes are useful for compliance. For example, if you wanted to make sure a user is wearing PPE clothing before they start a process then the user has to click through to confirm they have read the warning before they can proceed any further.
Step Tags can also be added, if required. These are commonly used for integrations and custom report creation. Note: Step Tags have to be unique.
To make the step Optional check this box. This will ensure that the user does not receive a warning if they navigate past this step without completing it. Additionally if the selections made fall outside of any predefined parameters, no warning will be given.
By default Static Options will be selected which means that only those options entered will be displayed to the user.
PLEASE NOTE: Dynamic Options is not currently supported.
Users can free type their options into the Opt1, Opt2, Opt3 boxes and add more options if needed. There is no limitation to the number of options that can be entered.
Fixed Mode is displayed by default but can be unchecked, if needed. Fixed Mode will only display those options entered during the Workflow build. If this box is unchecked then users will have the option to add their own option, if needed when completing a job.
PLEASE NOTE: Realwear headsets only support Fixed Mode.
Multiple Select gives the user the option to select more than one option from the predefined list, if needed. A minimum and maximum number of options can be chosen. If the user selects anything outside of this a warning will be displayed before the user can navigate to the next step, unless the step has been marked Optional.
Decision Step
Decision Steps provide the users with a choice to make. Decision Steps branch the workflow and can take users down different paths.
To populate the step with information double click on the step and this will bring up the Step Details panel. There are 3 tabs across the top: Step, Attachments and Properties.
TIP: You can use the dropdown arrow at the top to switch between different step types.
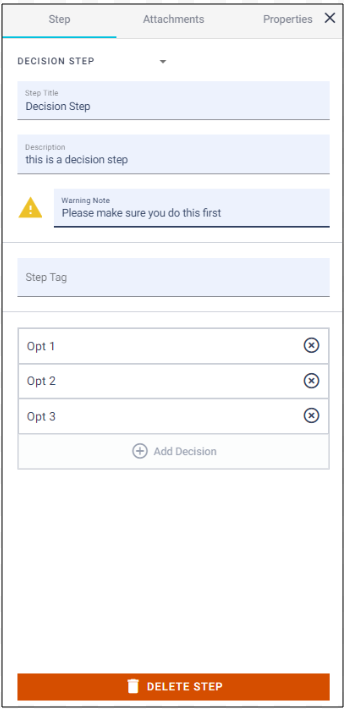
Enter the Step Title and Description in this panel.
PLEASE NOTE: Step Titles and Step Descriptions are not mandatory, however if you leave them blank you will see a yellow warning triangle. This does not prevent you from publishing the Workflow.
You can also add a Warning Note which will be displayed before the user can navigate through to the next step.
TIP: Warning Notes are useful for compliance. For example, if you wanted to make sure a user is wearing PPE clothing before they start a process then the user has to click through to confirm they have read the warning before they can proceed any further.
Step Tags can also be added, if required. These are commonly used for integrations and custom report creation. Note: Step Tags have to be unique.
Users can free type their decision options into the Opt1, Opt2, Opt3 boxes and add more options if needed. There is no limitation to the number of options that can be entered.
Once you have entered the choices, click on the Decision Step in your canvas and select the next step for that option in your Workflow. Then click back on the Decision Step and select the following step, and so on. Please remember to click back on the Decision Step before selecting the next step. The Opt1 path will be always be created first, followed by the Opt2 and Opt3 paths. You can use the Hand tool to move them around the screen as required after they have been added.
Group Step
Group steps allow the workflow to be broken down into sub-sections (more user-friendly when editing) and is where Form View and Loop Mode can be used. By default steps in a group will appear as regular steps unless these properties are changed.
To populate the step with information double click on the step and this will bring up the Step Details panel. There are 2 tabs across the top: Step and Properties.
TIP: You can use the dropdown arrow at the top to switch between different step types.
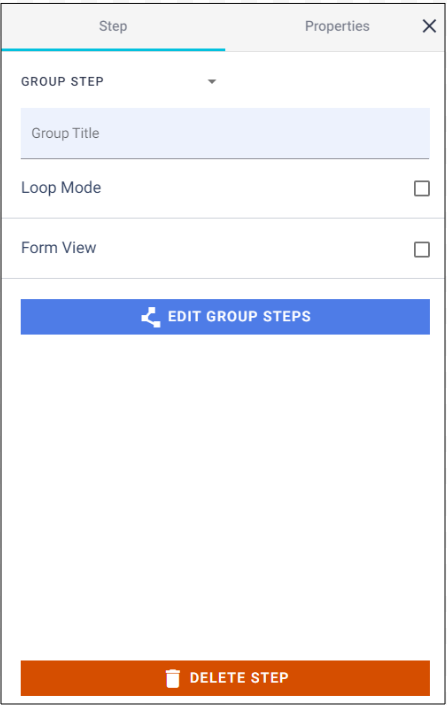
Enter the Group Title in this panel.
PLEASE NOTE: Group Titles are not mandatory, however if you leave it blank you will see a yellow warning triangle. This does not prevent you from publishing the Workflow.
Form View displays multiple steps on the same page and allows users to scroll up/down to answer the questions in any order they like.
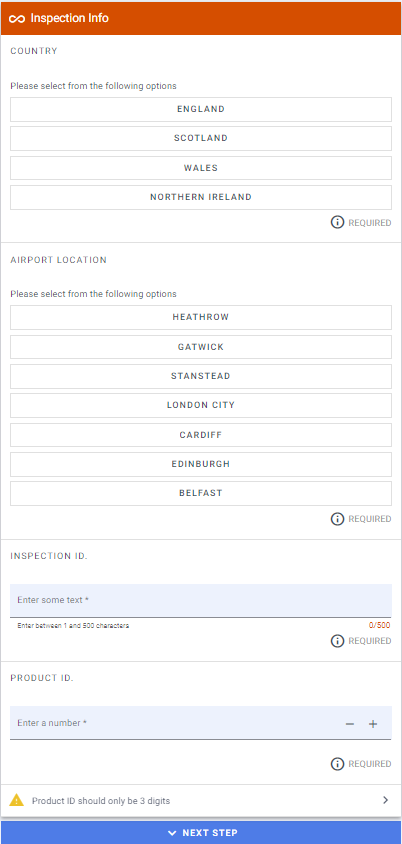
Loop Mode enables the User to loop round and answer a Form View set of questions an infinite number of times. This option is only available to Android mobiles/tablets.
PLEASE NOTE: Decision Steps are not supported in either Loop Mode or Form View
PLEASE NOTE: Loop Mode and Form View are not supported on Realwear headsets
Click Edit Group Steps to open up a new canvas in which you can continue your build.

Adding Steps to a Group is the same as on the main Workflow canvas. Due to the fact that steps are displayed on a single screen/page when running a job Decision Steps are not supported if you have activated Loop Mode and/or Form View.
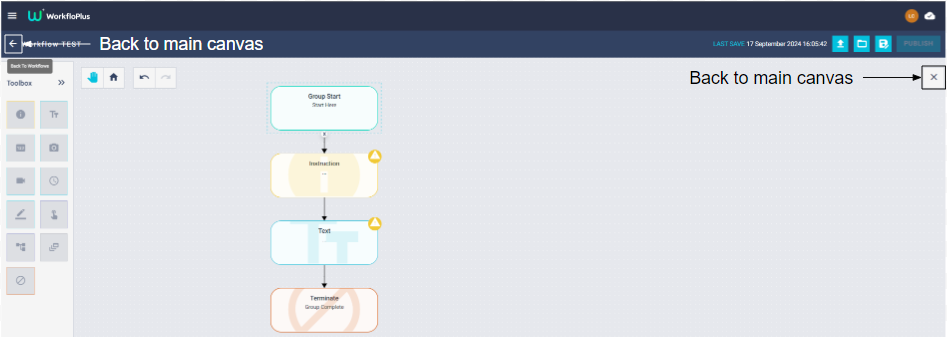
Groups are considered to be a 'mini' Workflows and therefore also require a Start Step and a Terminate Step.
To navigate back to the main canvas either click on the arrow top left or the X top right.
Terminate Step
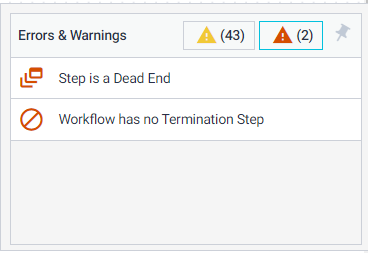
All Workflows and Groups all require a Terminate Step. It is not possible to publish a Workflow without these in place and an error will be displayed if it is missing. Clicking on any error links will take you to the affected step(s) directly.
Step Types